A request for a “300 dpi render” leaves out the size of the image. The same 3000-pixel-wide file can be printed at different widths. Changing its resolution metadata does not, by itself, create more detail.
Specify the destination first: a product card, a magazine spread, a presentation screen or a large display. Then agree the pixel dimensions and production requirements. That is more reliable than paying for an unnecessarily large file or discovering too late that the approved crop cannot fill its space.
Pixel dimensions and print density answer different questions
Pixel dimensions describe the image grid: 3000 × 2000 pixels contains six million pixels. Pixels per inch, or PPI, relates that grid to a physical print size. Printer dots per inch describe a different part of the printing process; the terms should not be used as if they were identical instructions.
For an image printed without resampling, the basic calculation is:
Print width in inches = pixel width ÷ PPI.
A 3000-pixel-wide image at 300 PPI is 10 inches, or 25.4 cm, wide. At 150 PPI it is 20 inches, or 50.8 cm, wide. The pixel count is unchanged. The second print distributes the same grid over a larger area; whether it is suitable depends on the intended output and viewing conditions.
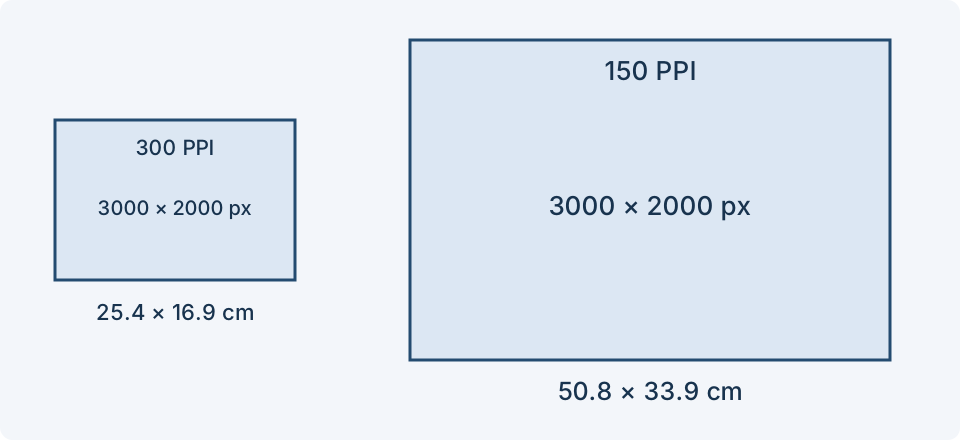
Changing a number is not the same as resampling
With resampling disabled, changing the PPI value changes the relationship between pixel dimensions and physical output size. Resampling changes the pixel grid itself. Enlarging the grid requires an interpolation or reconstruction process; it does not recover a guaranteed record of detail that the original render never contained.
Adobe’s image-size documentation distinguishes those operations. A useful check is to record pixel width and height before and after the change. If they are identical, a metadata adjustment has not turned a small render into a more detailed one.
Work backwards from a real layout
Suppose a designer needs an image area 20 cm wide and specifies 300 PPI for that job. The width calculation is 20 ÷ 2.54 × 300, approximately 2362 pixels. That is a worked example, not a universal print requirement. Confirm the required density, trim, bleed, colour handling and file format with the actual production workflow.
Now consider the crop. A landscape render may have enough pixels overall but place the subject too close to the edge for a square layout. The solution can require a different camera composition, not just a larger export. Include the intended aspect ratios and safe areas in the brief.
What a larger render changes
Doubling both width and height multiplies the number of pixels by four. That arithmetic does not prove that the render will take exactly four times as long: scene complexity, sampling, hardware, memory and other settings also matter. Do not turn a pixel-count ratio into a fixed cost or timing promise.
The Blender output-format documentation identifies the horizontal and vertical pixel dimensions and a percentage control for scaled test output. A small preview can help approve composition. It is still necessary to inspect a representative final-size detail before accepting fine text, edges or surface texture.
Ask for useful derivatives, not repeated masters
Keep the agreed master and prepare appropriately sized copies for the publishing channel. A web page usually needs an image matched to its layout and responsive delivery, rather than the largest print file loaded on every phone. Conversely, a heavily compressed preview should not quietly become the print master.
Use filenames that distinguish the master, crop and delivery size. Record which version contains the approved product and finish. If the image includes fine labels, inspect them after the final resizing and compression step, not only in the rendering application.
A complete output request
- Where the image will appear and the physical or screen layout it must fit.
- Required width, height, aspect ratios and crop allowance.
- Agreed file format, background and colour/output requirements.
- Which previews, final images and source assets are included.
- Who approves the final production file and at what viewing size.
Use that list with the visualisation workflow guide. The aim is not maximum resolution everywhere. It is enough verified information for the person receiving the file to use it correctly.
Historical context and verification
This independently written guide revisits the topic of the former studio’s article. It is not a claim to have carried out its projects or to offer its services. Historical source: original archived article.